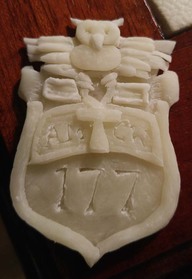
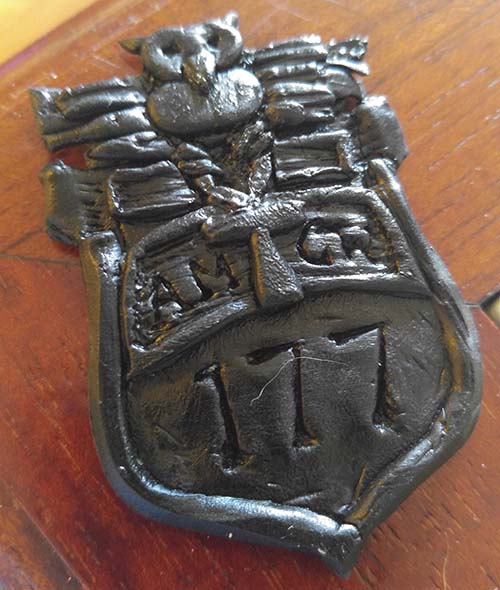
 For Joost's 40th birthday, I wanted to do something special. He's a giant Terry Pratchett nerd, and so something from the Discworld novels was an easy place to start. After planning an over-grandiose idea that there wasn't nearly enough time for (but will hopefully show up Christmas-ish) I settled on making him his very own Ankh-Morpork City Watch badge. It's not the final version. When I get my metalworking area setup I'll replace it with a proper lost wax casting of copper. But overall I'm very happy with how it turned out. Design The design was the first complication. The badges are not described consistently through the books. There was a "official" one made, but I can't just copy that. Plus I wasn't over-fond of the way they interpreted the descriptions. But then I had a stroke of luck. There's a set of postage stamps from the book and one of them featured the head of the City Watch, Sam Vimes. And as a decoration it included a view of his badge. That's just as official as the other, and it was quite a bit more like what I had in mind. So that's what I based my sketches on. It's not a precise copy of the design, mostly because that was for print and not physical media. There's a few nearly Esherian twists in the ornamentation that just wouldn't fly in 3d. Modelling Next was choosing a material. It's supposed to be made of copper, but I've done a lot of finish work for props, and so I know good and well it doesn't have to actually be made of that to look it. My daughter had just done a project using cold porcelain and had some left over. I'd never worked with it before, but I figured what the heck and I sat down to make a prototype. Getting those curls up around the top edge to look right wasn't easy. This stuff isn't as precise as modelling wax. It takes pretty good details, though. Sanding I let it dry for two days and then it was time to start cleaning up the rough spots. The process was backwards in a way. I didn't want it to end up perfectly smooth. So in the reverse of the usual order, I used a fairly fine grit sandpaper to just take the tooth off any burs, but left the main flaws. Then I got some really coarse steel wool and used that to add some serious character. There was one challenge with the material. I had some adventures with the various layers sticking together as I handled it. It didn't take me long to get tired of things randomly popping off as I was sanding. So I got out a pick and pried at every piece to see if they came off and glued down anything that shifted using a water-based superglue. Finishing It was almost a shame to paint it. The cold porcelain dried to a beautifully translucent ivory color, like fine bone china. But I got up my courage and started messing it up. First, I put on a layer of black to make sure the bottoms of all the nooks and crannies were dark. One of my favorite things to use for that is black scuff remover for shoes. It's a leather dye in a water-based carrier. It dries to a matte finish that takes other layers of various paints and things well, and when it's dried it helps the upper layers adhere. It comes in a convenient applicator, and is easy to manage and clean up. After that, I did three very fine layers of copper spray enamel from three different directions to make sure I got all the nooks and crannies. When it comes to spray paint, the finer the layer, the better the final product is going to look. Once that was good and dried, I rubbed in some more of the dye to grunge up that shiny finish. Then I topped it off with a layer of clear sealant just to make everything stay put and behave. Then I added a pin-back and started work on the case.
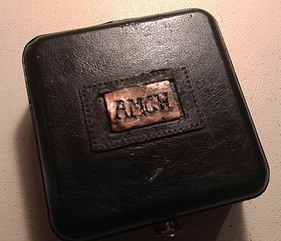 Presentation Case I had an old clock-case that I'd had sitting around that just needed the right kind of TLC. I mended the leather stitching in some places, put some artistic wear and tear on it in others. There was already a panel inside but the hinges were broken and not in the right place so I replaced them. Then I attached the clay nameplate I'd made the same way I made the badge to the top. That's the fourth picture. The flap inside the case had a round hole for the old clock, which I rimmed with leather and then filled with a felted panel to stick the badge to. Here's the whole thing all together.  |
Archives
October 2020
Categories
All
|
 RSS Feed
